Showing posts with label creative. Show all posts

Floral Love

Apr 14, 2014


Can you tell I'm a bit obsessed with flowers? I've started buying them randomly from the grocery store just because I like to have them in our home. These lovelies were a gift from my sister-in-law for my birthday. She just gets me! After they started to wilt just a touch (over a week later!) I decided to make a flower mandala out of them. I'm taking a Sacred Pregnancy course in postpartum care right now and one of the things we focus on is honoring. This flower mandala was made to honor me as a mother and a birth worker. I used colors that I love and flowers that I love to create something beautiful for myself. I'm pretty sure I nailed it! 

xo Sue

DIY Floral Crown

Apr 11, 2014


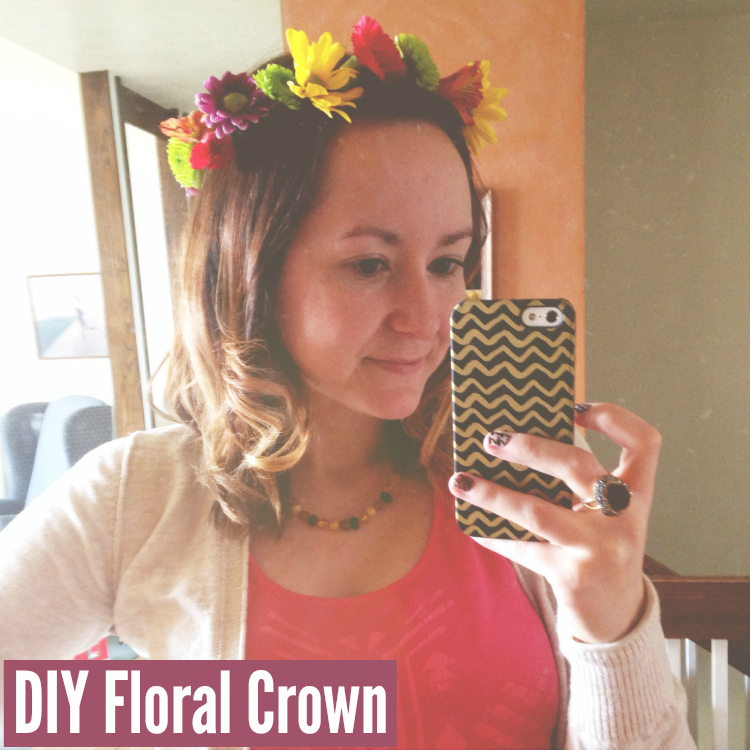
Remember this lovely little number from my Birthday Week? It's not really a secret that I'm obsessed with floral crowns (see here, here, and here for some examples) but up until now I've only made them with faux flowers. I like them to last a while! For my birthday I decided to make my first fresh floral crown but these are the steps you can take for a quick DIY with fresh flowers or faux. A lot of my faux ones become more complex/involved than this, but this is a good place to start if you're a beginner. This is what I do if I want to whip one up in five minutes! 


1. Take some green florist wire and cut it longer than you need. Measure it around your head for an accurate size and then wrap the ends so they stay put pretty well. I usually measure 5-6 inches longer than what I need for this.
2. Cut up your flowers! If you're using faux cut the pieces you want off the stem. Same goes for fresh.  You can leave the stems longer than you need and cut them down while you're working. Once you've done this a few times you'll get a good idea on that too! 
3. Take your green floral tape and start wrapping! Line up the wire and the flower stem and wrap them tightly with the tape so they're secure. You can put the flowers as close or far apart as you like. 
4. Admire your handy work and wear your beautiful crown out somewhere! Yes, you'll probably get looks (I know I always do) but you'll look great so who cares? Also, if you're making fresh floral crowns I recommend doing it only an hour or so before you plan to wear it. This one held up well but by the end of the night some of the flowers were starting to wilt. I was glad I made it right before I left the house. 


And that's it my bloggy friends. That's everything you need to know to make a beautiful floral crown! Of course you can always modify this in many ways. Yours can be fuller or more sparse depending on your preference. For the really big flowers I usually pull out my glue gun and some plain headbands. I've found they stay a lot easier that way. Enjoy! 

xo Sue

(Blog) Design Love

Apr 2, 2014

Take a look around- do you love my new design? I'm infatuated. It was done by the phenomenal Fran of Freeborboleta Designs. I know, I know, half of my job is to do design and websites (currently making about a billion of them!). So why on earth would I have someone else do my personal blog design for me? Because I was SO sick of doing it myself. Don't get me wrong, I love designing for Sacred Pregnancy and the beauty and energy I've put into the new sites we're about to launch has been amazing. I'm so proud of the work I'm doing there! But when I looked at my own personal blog I was feeling defeated. I was hating it. It didn't have the vibe I was going for and I simply didn't have the time to fix it up. 

I've always been a big fan of Fran's designs. She does such an excellent job of catering to what the client wants and not just doing the same design over and over with slight variations. She took my jumble of "ums" and "maybes" and turned it into this beauty! She has this wonderful survey you fill out when you book your place on her design list and mine was like "well I really like the font of this but I also like the font of this and they're not similar at all" and "this picture is so pretty and this one is so dark and edgy and I love them both." I'm sure when she got my survey she just laughed- and I wouldn't blame her one bit! I think the gist of the survey was that I wanted something new, fresh, fun, whimsical, and a little bit earthy. I've really evolved as a person over the last few years and I wanted it to reflect where I'm at now. I'm very much about herbal, natural, and lovely things. The picture used in the header was one I sent to Fran. It was taken at the Sacred Pregnancy retreat I went to in February but made into a water color (thank you waterlogue!). I didn't think to use it until Fran sent me her mock up and suddenly it all came together. 

I am so thrilled with this beautiful new design! And best of all, Fran was a dream to work with. If you're looking for a new blog design you should check her out. You won't be disappointed! 


xo Sue

Life in Watercolor

Feb 10, 2014

I'm not the first to mention it, and I won't be the last, but this app is beautiful. The Waterlogue app is my new obsession (see below!). I've had so much fun taking special moments from our lives and turning them into watercolors. Everly's newborn pictures and my maternity pictures were especially gorgeous in watercolor. I've already ordered prints of my favorites to frame and put into a gallery wall when we move. I've always wanted to be an artist because I love how watercolor looks. Now I have these. I still wish I had this kind of raw talent though. Wouldn't that be amazing?

xo Sue

A Contributor

Jan 16, 2014

This past week on Instagram I've been participating in a mini project hosted by We Are the Contributors. If you haven't visited their website or read about their projects you should go check them out. They're so creative and inspiring. For this mini project the goal was seven days of selfies and I remembered to do one every.single.day. That's not always easy! But they were a lot of fun to do and I'm glad I participated. These are my seven. I tried to do something a little different each day and there's only one full on, looking at the camera and smiling, selfie in there. Some days it was hard to come up with a different idea and some days they just appeared as if from nowhere. My favorite picture is the lips. That one was too fun. 


xo Sue

Salt Dough Ornaments

Nov 15, 2013

Today I'm linking up with the Pintester Movement: Ho Ho Ho Edition. If you haven't heard of the Pinteseter you definitely need to check her out. Her blog is all about the pins she actually makes/tests from Pinterest. They're pretty entertaining. I planned to do this a few days ago but since life had other plans it all fell to today (which coincidentally was the last day to play).

My original idea came from this image I found on pinterest. I cannot for anything find where it originally came from though, and believe me, I've looked! The farthest back link I've found is here but that's where the trail ends. I also found something pretty similar here that I liked a lot. Anyway, if you know where the pin originated please let me know so I can update my links. Also, I didn't like how the recipe from the image turned out and decided to go with this one instead (but I halved it since I only needed a few ornaments). It was very simple and we had a lot of fun with it.

Whew, that was a lot of explaining for one pin! So today my neighbor girls came over to play. I asked what they wanted to do and they said something fun. I told them that Everly and I were about to make Christmas ornaments and they were thrilled over that idea. So they jumped right up onto their stools and we all made ornaments.


Everly hung out in the sling with the girls and I worked on our ornaments. She was helpful by lending me her tiny hand to make handprints. I made 2 of hers, turning one into Santa and one into a keepsake for myself. The Santa one I finished with paints and the handprint I just used a marker to color in her hand. I haven't had a chance to seal them yet because they haven't completely finished drying, but I'll do that in the morning. And in case you don't want to follow the links, here's the recipe I used.

Salt Dough Recipe
  • 2 cups flour
  • 3/4 cup warm water
  • 1/2 cup salt
Preheat oven to 325. Mix dough (I used the bread extension on my kitchen aid but you can hand mix it too). Make your ornaments (be creative if you like- my husband made a mini Cartman). Bake for 1 hour. Decorate! 

xo Sue

30 Days of Self Portraits

Aug 16, 2013

30 days? I know, how vain can a person be, right? A month ago the lovely ladies at A Beautiful Mess issued a challenge to do 30 days of self portraits and I couldn't resist- I wanted the challenge of 30 days of pictures without just looking at the camera and smiling. I was excited to get creative because who wants to see my face every single day? Not me. Sometimes I don't even look in the mirror. Yep, I'm that girl. But that's not the point. It's funny how Everly has changed in such a short time but I didn't really. Now the 30 days are up so I thought I'd share my month of vanity with you. Enjoy!


My favorites are 3, 15, 25, and 28. All pictures that include my sweet Ever. Coincidence? Probably not. She's pretty adorable. 

xo Sue

Blog Button Design Battle

Jul 5, 2013

So I'm participating in this fun thing right now called Blog Button Design Battle over at Peacoats and Plaid. I was going to share the html of her post but for some reason it's not working so I'll link you there instead. Basically there are 10 blog buttons in the battle and you're supposed to vote for what you think the most eye-catching button is. I'm not asking you to vote for mine (unless you think it's the most eye-catching!) but I definitely think you should go vote!

And in case you're curious, this is my blog button.


Custom Canvas Quotes

Dec 12, 2012

I've been nesting! My daughter's room is my favorite room in the house and it's not even done yet. It's been a little frustrating because everything I've wanted I've had to order online and the waiting on overseas shipping makes me crazy. I can find decor here but the big things (like furniture!) have been much more difficult. My favorite part of decorating her room has been my DIY projects. It makes me feel like I'm really creating this space for her. They've all been very simple but I've learned that things don't have to be extravagant or difficult to be beautiful. So far these custom canvas quotes have been my favorite project and after sharing them on Instagram I've had numerous requests for the tutorial. So by popular demand, I give you my insanely easy custom canvas quotes tutorial.

Materials needed
blank canvases
paint brush
mod podge (I used satin, a great mix between glossy and matte)
quality printed photos (I made mine on PicMonkey and ordered them from Shutterfly)

Start by painting the blank canvas with a thin coat of mod podge. Lay your photo on the canvas and flatten it out so there are no bubbles. Cover the entire photo with mod podge, going over the edges to make smooth lines. Let it dry completely. Hang your canvas photos anywhere you want and enjoy the beautiful finished product!


I used 5x7 canvases and photos because I didn't want them to take away from the rest of her room, just add a little something special, but you can use any size you like. Also, be sure your photos printed are a good quality. The first ones I had printed at a tiny local store in Japan were terrible. They bubbled and peeled and curled in on the edges. The prints from Shutterfly were perfect and gave me no trouble at all. I've also made something similar to this with photos printed on my own printer and they worked great as well. As long as you have quality photo paper this project will work well.
xo Sue

DIY Maternity Tunic

Oct 10, 2012

Like most things I've posted lately, this is my version of a DIY I thought would be fun. I LOVED making this tunic. It was very easy and turned out so cute. I wear it when I want to be a little dressy, but not so much that I actually want a dress. Does that make any sense? It does to me. I got the tutorial from one of my favorite creative inspiration blogs, A Beautiful Mess. The instructions are quite easy.

  • Start by buying 2 yards of jersery fabric. My BFF Jess brought this with her from the States when she came to visit back in August because it's nearly impossible to find here in Japan. 
  • Use a model (we used me since I'm the one it was for) and drape the fabric how you want it to go. Make sure it's fairly even in the front, although you can trim it up if you need to.
  • Mark your arm placement and cut arm holes- a 5 inch straight slit for each side.
  • Trim up the edges and hemline so they look pretty, straight or curvy, it's up to you.

Simple & cute. My favs when it comes to maternity clothes.

xo Sue

DIY Instagram Art

Jun 26, 2012

I originally wrote this up for a guest post but I love the project so much I want to share it on my blog too. I'm the first to admit that I'm not big on DIY. I'm just not very good at it and if a project requires more than 4-5 items to complete it... well I give up. But this is a project EVEN I could do. And I loved it! 

We all love Instagram. I'm a little bit addicted. After taking the pictures & saving them to your computer do you do anything with them? (If you do I'd love to know!) I was itching for a project so I had to brainstorm. I'm sad to say I didn't come up with the original idea for this project, but I loved it so much I have to share it with you anyway.  

It's quick, easy, and you only need a few simple things: Printed Instagram pics (I printed mine at home but you can find several places to order them online), a blank canvas, Mod Podge (I used semi-gloss), and a paint brush. That's it. And the steps are simple too. 
  1. Gather your supplies and decide how you want to layout your pics.
  2. Start in the corned and use the Mod Podge to attach the photos until they're all nice and pretty.
  3. Seal the collage with another coat of Mod Podge to smooth everything out.
  4. Allow your Insta-Art to dry and hang it up for everyone to admire.
I also went to the trouble of cropping out the borders because I wanted them to all match, but that's in no way a requirement. You can do what you want- that's the beauty of DIY art & home decor. You can truly make it yours. Enjoy!

PS Want to win some awesome prizes from me (gift cards, blog design, awesome things like that)? Go here, here, and here.

Instagram to Postrgram

Jun 21, 2012

Remember last week when I had to apologize for going overboard with all the Instagram pics? Now you get to see exactly why I did that! Next week I'll share an art project I did with some of mine, but for now I'm going to show off this beauty. I don't usually want 3'x3' pics of myself in the house (I swear I'm not that vain) but this is one of my husband's favorites and he helped me pick it out. The best part? It's made up entirely of my personal Instagramed pics. 


I know you love this and now you want one of your own, right? Go visit Postrgram to get yours. Seriously, they were so awesome to work with. I had questions before I ordered that were all answered immediately, and I got to approve a proof of my poster before it was actually printed. A year of my life all in one picture. I'm in love.

PS Do you want to do a sponsor swap in July? I have a few spots left so shoot me an email if you're interested!

New Blue Hair

Jun 11, 2012

I used to have purple hair. Then one day I had to change it for a job (stupid job- except not because that's where I met the husband). Then I was going to dye it back but Aaron and I got engaged and I figured I'd keep it classic for the wedding. But I reached my limit and it was definitely time for a change. So I dyed it all dark brown and left a random blue streak, just because I wanted to. I love having unusual, original colors in my hair- and Aaron is crazy for the blue so I can't complain. Oh, and my handsome Twink baby got a haircut for summer. Tell me he's not adorable.


What awesome hair colors do you like to have fun with?